
 One of the most powerful and versatile applications in the Google Drive suite is Google Forms. Forms is the ideal way to create surveys and is perfect for submitting assignments to teachers. Forms can also be used by coaches and club advisors to organize and manage information about their players or members. As part of the Help Desk course, we use Google Forms to submit all of our assigned work. Our instructor, Mrs. Scheffer, created a form for all of us in the Help Desk program. The form, titled “Help Desk Assignment Turn-In,” was shared with us and we access it through Drive on our iPads or on a computer.
Using Google Forms to Streamline Workflow
Using Google Forms is convenient for both me as a student and for my teacher. After every assignment I complete, I submit my work by copying and pasting the URL of the file into the form. Mrs. Scheffer then opens the spreadsheet linked to the form and has access to not only my files, but all of my classmates files in one convenient location. All of our folders have been shared with her and she has editing rights. But rather than access our work through clicking multiple folders, she can click on one link in the spreadsheet. We have found this workflow to be the easiest and most streamlined method to submit and access work and it allows us to be paperless. Mrs. Scheffer uses the comment feature in Docs and gives us feedback on our assignments. We then edit our documents based on this feedback and submit for a final grade. We recently went through this entire process when we completed our career portfolio projects. Mrs. Scheffer is the only teacher I have who is using this workflow, but I think it’s one that other teachers should consider and see how they like it. Forms can be made private so that the teacher has full control over who can submit responses. The timestamp can be controlled by teachers which is hugely important because it prevents changes to the date and time of submitting work.
Creating a Form
Creating a Form is a simple process. First, you choose a theme and give your Form a title. As you can see from the screenshot below, there are themes students could use for both academic and personal reasons. For example, if I was throwing a graduation party (June 8th is right around the corner!) I would use the balloon theme.

Adding Questions
The next step is to add questions. There are nine different types of questions you can choose from including multiple choice, text, and check boxes. You also have the option to determine if each question is required.

Once your form is complete, you’ll want to choose the confirmation page settings before sending the form to recipients.
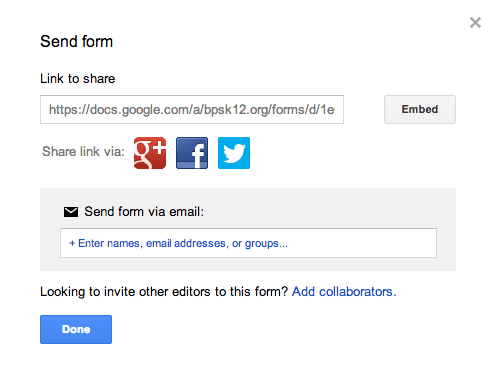
 Sending and Sharing a Form
There are several options to choose from when sending and sharing a form including email, Google+, Facebook, and Twitter. Forms can also be embedded into blogs, websites, and emails. Just like with Google Docs, Forms can be shared with others for collaboration purposes and these additional users have editing rights.
 Benefits of Google Forms:
- Add themes
- Choose a destination for the responses to go
- You can validate answers
- You can share your forms
- Manage responses
- Allows students to feel more confident that their work is turned in correctly
Looking For More Ideas?
Below are three links to additional ways Google Forms can be used in the classroom. If you wish to give the Form work submission a try and want assistance in creating and embedding the form, please don’t hesitate to come see us in the Help Desk for one on one help.
Creating a Google Form (from the Google Drive Support Center)
10 Ways I Use Google Forms in my Tablet Classroom80 Interesting Ways to Use Google Forms to Support Learning (includes a Google presentation with ideas)
10 Ways I Use Google Forms in my Tablet Classroom80 Interesting Ways to Use Google Forms to Support Learning (includes a Google presentation with ideas)
A Tour of Google Forms

No comments:
Post a Comment